
What the Scanner Shows
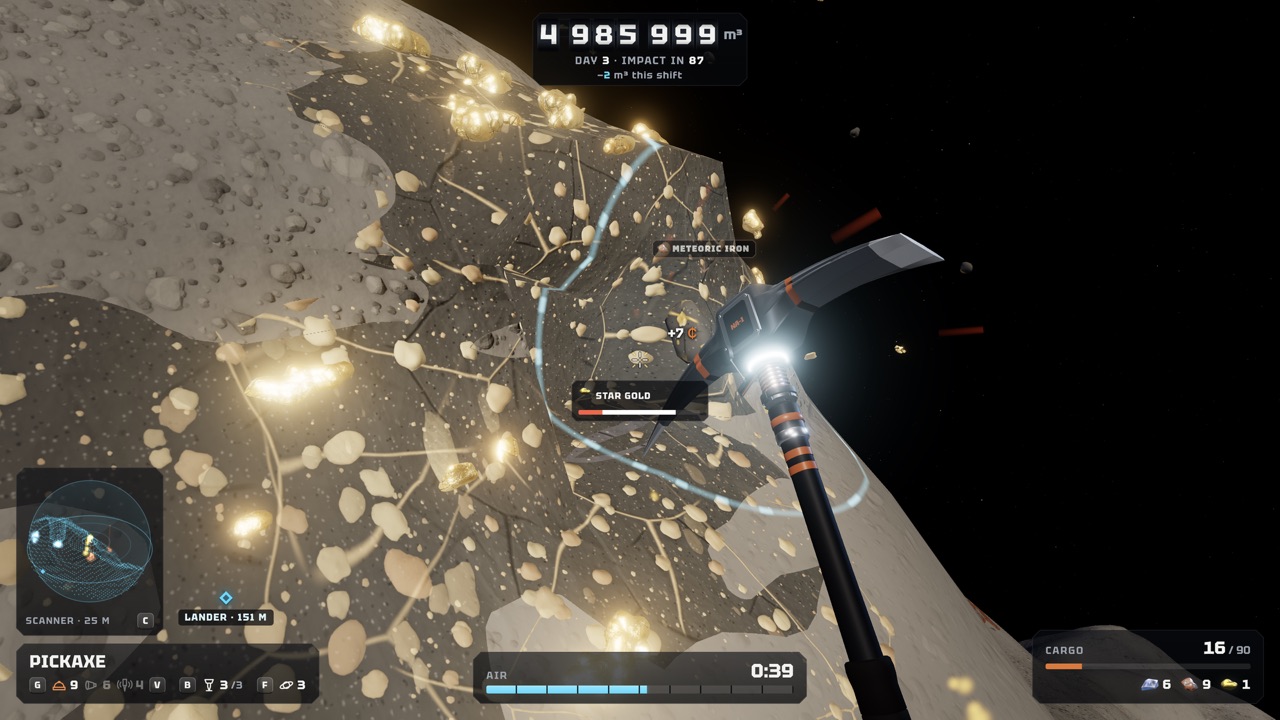
The scanner labels ore in the rock in front of you. In an official day-3 screenshot, floating tags read METEORIC IRON and STAR GOLD on nearby deposits. The ore you are hitting shows a progress bar under its name.
The developer adjusted the scanner’s tags for ore directly in front of the player after demo feedback. That makes the tags most useful for the rock you are facing. Scan, read the label, then decide whether it is worth digging.
Find the Scanner Readout on the HUD
The scanner panel sits at the bottom left of the mining HUD. In the official screenshot, it shows a small sphere view and the text SCANNER · 25 M. That number is the scanner range in that build.
The range may change with upgrades or patches. Treat 25 m as an example from one screenshot, not a fixed rule. Check your own HUD for the current value.
Which Key Opens the Scanner?
In the official screenshot, the scanner readout shows a C key prompt next to it. Keyboard rebinding arrived on November 19, and on-screen prompts follow your chosen bindings. So the prompt on your HUD is the best guide.
If you changed your bindings, open Settings to find the scanner action. The November 20 update also allows mouse side buttons, arrow keys and numpad keys as bindings. Controller players should check the gamepad prompts.
Step by Step: Scan and Mine
Follow this order on each new rock face:
- Face the rock and use the scanner on the area ahead.
- Read the ore labels that appear on deposits ahead.
- Check the SCANNER range so you know how far it reached.
- Check the LANDER distance and your AIR bar before going deeper.
- Mine the deposit with a tool that can reach it.
Scanner vs. Lander Distance
Do not confuse the two readouts. SCANNER shows the scan range, while LANDER shows how far you are from the lander, such as 151 m in the official screenshot. Both sit next to each other at the bottom left.
The lander distance matters more for safety. If the lander leaves without you, you black out and lose your cargo. See how to return to the lander.
Which Ores to Look For
The trade terminal lists Space ice, Meteoric iron, Star gold, Space crystal and Plasmite. Each has its own price, and prices change daily. Check the terminal before a shift to know what is worth most.
Antimatter is rarer. Its base sale price rose from $56 to $150 on November 20. Our antimatter location page explains what is confirmed about finding it.
Use the Scanner With Your Tools
A labeled deposit is only useful if you can reach it. Faster tools such as the drill and laser let you dig to deposits more quickly. Charges clear larger areas at once.
Drones help too. The Prospector keeps working while the ship’s hold has room, and the Digger seeks nearby rock on its own. Read No Asteroids asteroid mining for the full tool list.
Scanner Tips
Scan whenever you open a new tunnel or reach a new rock face. Deposits hidden behind rock are easier to plan around once labeled. This saves air and cargo space for valuable ore.
In co-op, call out what the scanner shows. A friend can open a tunnel into an ore vein, and you can follow them in and work it from the other end. The co-op guide covers crew play.
Read the Rest of the HUD
The scanner works best alongside the other readouts. In the official day-3 screenshot, the AIR bar at the bottom shows 0:39 left in the shift. The CARGO panel at the bottom right shows 16 of 90, with a count for each ore you carry.
The counter at the top shows the remaining volume and the days until impact. Glance at all of them before you follow a label deeper into the rock. A rich deposit is not worth it if your air runs out on the way back.
Labels, Pop-ups and Combos
When you hit labeled ore, a small credit pop-up shows its value, such as +7 in the official screenshot. The label for the ore you are mining also shows a bar under its name. Labels for nearby ore stay visible while you work.
Since November 20, the combo shows an ore icon and a multiplier. The developer removed an older cash counter beside the crosshair because it was misleading. Keep mining labeled ore in a row to keep the combo going.
Scanner Problems and Fixes
If the scanner prompt does not match your key, check your bindings. Since November 19, on-screen prompts follow whatever you set in Settings. Rebinding does not reset older custom bindings when new actions are added.
If labels seem to miss ore, aim directly at the rock face. The developer tuned the tags for ore directly in front of the player. Older videos may show scanner behavior from before that change.
Frequently Asked Questions
Why do scanner tags look different in older videos?
The developer adjusted the tags for ore directly in front of the player after demo feedback, so older footage may differ.
What key is the mineral scanner?
An official screenshot shows a C key prompt next to the scanner readout. Bindings can be changed, so check the prompt on your HUD or Settings.
How far does the scanner reach?
The official screenshot shows SCANNER · 25 M. Treat this as an example; check your HUD for the current range.
Does the scanner show ore through rock?
It labels deposits in the area you scan in front of you. The developer improved tags for ore directly in front of the player.
Official Video
Sources and Further Reading
- Steam discussion · Demo feedback and developer replies on antimatter and the scanner
- Unruled Games · Keyboard Rebinding & Co-op Fixes (Nov 19)
- Unruled Games · Save Slots, Hard Mode & Co-op Improvements (Nov 20)
- Steam · No Asteroids store page (app 5527800)
- Unruled Games · No Asteroids game page and press kit
- Unruled Games · Official Workshop screenshot
- YouTube · Sonoket Gaming, No Asteroids Part 1 (Nov 20)